[Electron] 빌드(build) 하기
다음 글 : [Electron] 빌드(build) 하기 2 ( electron-builder )
만든 Electron 어플리케이션을 빌드(Build)하는 방법이다.
electron-package, electron-winstaller 등 사용(테스트)해봤는데,
electron-builder가 가장 깔끔하고 간편한 것 같아 ( 가장 한글 문서가 많기도 했다. )
electron-builder 사용 법에 대해 간략히 설명하고자 한다.
1. electron-builder
기능
- NPM 패키지 관리
- 어플리케이션이 패키징되면 자동 업데이트함. ( 버전 관리 됨 )
- 다양한 타겟으로 포멧팅이 가능함.
설치
$ npm install -g electron-builder
사용 방법
package.json파일에 build를 추가해주면 된다.
아래는 예로 내가 사용한 build 이다.
"build": {
    "asar": false,
    "appId": "com.project",
    "productName": "Project",
    "win": {
      "target": [
        {
          "target": "nsis",
          "arch": [
            "x64",
            "ia32"
          ]
        }
      ],
      "icon": "./resources/installer/Icon.ico"
    },
    "nsis": {
      "oneClick": true,
      "perMachine": false,
      "installerIcon": "resources/installer/Icon.ico",
      "createDesktopShortcut": true
    }
  }
위 옵션 말고 더 다양한 옵션들이 있지만,
이 옵션들만 사용해도 충분히 installer 를 만들고 build 할 수 있다.
🤜 각 옵션 별 설명
asar
asar 패키지 사용할지 여부
asar는 어플리케이션(app) 파일들을 묶어준다.
(압축하여 암호화가 되는 게 아니라 asar로 파일을 합쳐주는 것이다.)
파일을 열어보면 코드 그대로 보인다.
- 디폴트는 true.
- "ejs-electron" 를 사용한 경우 asar를 하면 app 파일을 정상적으로 못 갖고 오기 때문에 false 로 했다.
appId
어플리케이션 고유 id
productionName
어플리케이션 이름이라 생각하면 된다.
win
윈도우 installer(builder) 설정
- target : 윈도우 인스톨러 타겟 포멧 설정
- icon : 윈도우 어플리케이션 파일 아이콘 설정
nsis
windows 의 nsis 타켓 빌드 방법 설정
- oneClick : 인스톨러 파일 한 번 클릭 시 인스톨 되도록 설정. (디폴트는 true)
- perMachine : 설치가 항상 모든 사용자 (컴퓨터 별)인지 여부. (디폴트는 false)
- installerIcon : 인스톨러 파일 아이콘 설정
- createDesktopShortcut : 인스톨러로 설치 시 바탕화면에 바로가기 아이콘 생성.
그리고 electron개발하면서 npm 으로 설치한 파일들은 package.json의 dependencies 에 선언되어 있어야 한다.
| 선언되어 있지 않은 경우 build 할 때 또는 build 후 인스톨할 때 해당 패키지가 없다고 오류 발생!
설정이 완료되면, build 하면 된다.
$ electron-build build
Configuring yargs through package.json is deprecated and will be removed in the next major release, please use the JS API instead.
Configuring yargs through package.json is deprecated and will be removed in the next major release, please use the JS API instead.r release, please use the JS API instead.
  • electron-builder version=20.39.0
  • loaded configuration file=package.json ("build" field)
  • writing effective config file=dist\builder-effective-config.yaml
  • no native production dependencies
  • packaging       platform=win32 arch=x64 electron=4.1.4 appOutDir=dist\win-unpacked
  • asar using is disabled — it is strongly not recommended solution=enable asar and use asarUnpack to unpack files that must be externally available
  • no native production dependencies
  • packaging       platform=win32 arch=ia32 electron=4.1.4 appOutDir=dist\win-ia32-unpacked
  • asar using is disabled — it is strongly not recommended solution=enable asar and use asarUnpack to unpack files that must be externally available  • building        target=nsis file=dist\Project Setup 1.0.0.exe archs=x64, ia32 oneClick=true perMachine=false
  • building block map blockMapFile=dist\Project Setup 1.0.0.exe.blockmap
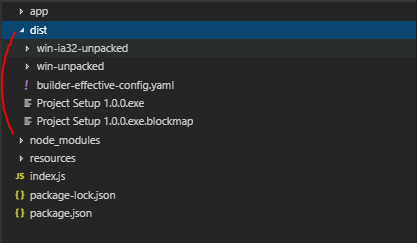
build 가 끝나면 dist 폴더가 생긴다.

"win-unpacked" 폴더는 Setup 파일이 unpack된 파일이다.
만약, 빌드 옵션에 asar를 true로 한 경우 win-unpacked/resources/ 에 app.asar, electron.asar이 존재하고,
false 로 한 경우 아래와 같이 app이 개발 폴더 그대로 들어가 있다.

"프로젝트명 Setup 버전.exe"이 설치(installer) 파일이기 때문에 이 파일을 배포하면 된다.
Setup 파일로 설치하게 되면, win x64 로 build 했기 때문에 C:\Program Files에 파일이 설치된다.
'WEB > Electron' 카테고리의 다른 글
| [Electron] window.require is not a function 에러 (0) | 2019.05.08 |
|---|---|
| [Electron] electron 최신 버전으로 업그레이드 (0) | 2019.05.04 |
| [Electron] build 시 unresolved modules 오류 해결 방법 (0) | 2019.04.26 |
| [Electron] img 태그 src="file://~" 경로에 존재하는 파일이 로드되지 않는 경우 해결 방법 (0) | 2019.04.24 |
| [Electron] HTML에 다른 HTML 파일을 include하여 사용하기 (0) | 2019.04.16 |
